
DeepSeek, even though it is relatively new, has made quite a mark in the artificial intelligence market. With the help of Janus-Pro-7B, DeepSeek is making waves in the field of image generation. By allocating separate systems to understand visuals and create them, Janus Pro has been able to make enchanting images. In this post, we will learn more about Janus-Pro and see how to use DeepSeek to generate images.

What is Janus-Pro DeepSeek?
Janus-Pro by DeepSeek AI is an advanced AI model that can both understand and generate images and text. Unlike traditional models, it separates visual processing into two distinct systems: one for interpreting images and another for creating them. This division allows Janus-Pro to handle both tasks with greater accuracy, making it more effective in generating high-quality visuals and meaningful text.
The model works by using DeepSeek-LLM for text and SigLIP-L as its vision encoder, meaning it can process high-resolution images while maintaining deep text comprehension. Its dual-pathway architecture ensures seamless integration between multimodal understanding and generation, making it useful for tasks like art creation, content writing, and AI-assisted image interpretation.
How to use DeepSeek to generate Images
If you want to use DeepSeek to generate images, you can follow one of the methods.
Try Janus-Pro using Hugging FaceRun Janus-Pro locally
Let us talk about them in detail.
1] Try Janus-Pro using Hugging Face

If you just want to test the Janus-Pro, without creating any account, Hugging Face is your best bet. You can go to huggingface.co and access the tool. Once you click on the hyperlink and go to the website, you will see two options: Multimodal understanding and Text-to-image generation.
This multimodal understanding lets you upload images, like photos, charts, or memes, and ask questions about them. For instance, you can upload a busy street photo and ask, “How many people are wearing hats?” or share a graph and request, “Summarize the key trends.” The model analyzes both the image and your text to provide detailed answers and insights.
Text-to-image generation lets you create new images using simple prompts, such as “Create an image of Goku from Dragon Ball Z fighting Brock Lesnar from WWE.” You can adjust settings like size or style as needed. The model produces high-quality images (e.g., 1024×1024 pixels) that are great for designing logos, brainstorming game characters, or visualizing your ideas.
Read: How to use Copilot to generate Images
2] Run Janus-Pro locally
Now, if you are satisfied with the demo, you can install Janus-Pro on your computer locally. However, before we go ahead and install Janus-Pro locally, you will have to make sure that your machine meets the following system requirements.
GPU: NVIDIA GPU with 16GB+ VRAM (e.g., RTX 3090/4090).RAM: 16GB minimum (32GB recommended).Storage: 20GB+ free space for models and dependencies.Operating System: Windows 11/10Tools:Python 3.10+ (with “Add to PATH” enabled during installation).CUDA Toolkit (matching your GPU driver version).Microsoft Visual C++ Build Tools (for compiling packages
To do so, you would have to follow the steps mentioned below.
You would need to have Python 3.10+ and Git for Windows.Then install CUDA from developer.nvidia.com and Visual Studio from visualstudio.microsoft.com, make sure to tick “Desktop development with C++”Now, we need to set up the environment. You can run these commands anywhere, but it is better to open Visual Studio Code in your project directory.python -m venv janus_env
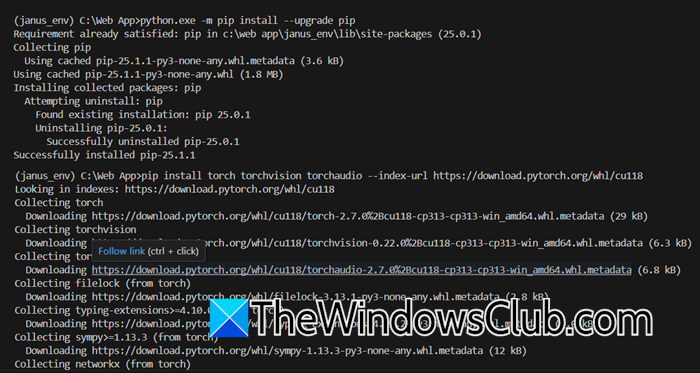
janus_env\Scripts\activateWe then have to install dependencies inside the environment using the following commands.pip install –upgrade pippip install torch torchvision torchaudio –index-url https://download.pytorch.org/whl/cu118
# Replace “cu118” with your CUDA versionpip install transformers sentencepiece accelerate
Note: Here, we will upgrade PIP, install Pytorch, and then HuggingFace Libraries.
Now, in Visual Studio Code, inside the same environment, create a new Python file, and name it download-Janus.py.from transformers import AutoModelForCausalLM, AutoTokenizer
model_name = “deepseek-ai/Janus-Pro-7B”
tokenizer = AutoTokenizer.from_pretrained(model_name)
model = AutoModelForCausalLM.from_pretrained(model_name)
print(“Model downloaded!”)You then have to run the script and let it download the model.
That’s how you can download DeepSeek Janus Pro 7B.
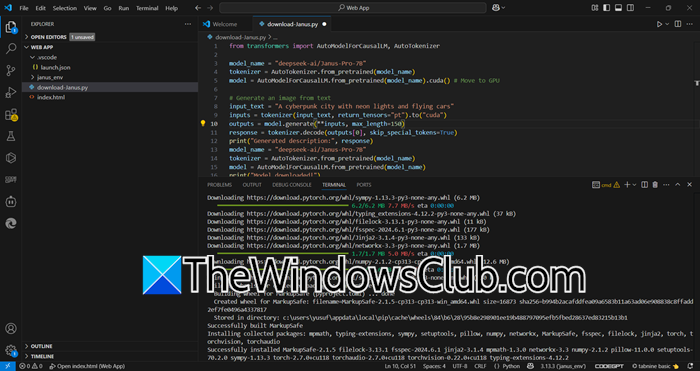
If you want to test out the model, you can run the following script.
from transformers import AutoModelForCausalLM, AutoTokenizer
model_name = “deepseek-ai/Janus-Pro-7B”
tokenizer = AutoTokenizer.from_pretrained(model_name)
model = AutoModelForCausalLM.from_pretrained(model_name).cuda() # Move to GPU
# Generate an image from text
input_text = “A cyberpunk city with neon lights and flying cars”
inputs = tokenizer(input_text, return_tensors=”pt”).to(“cuda”)
outputs = model.generate(**inputs, max_length=150)
response = tokenizer.decode(outputs[0], skip_special_tokens=True)
print(“Generated description:”, response)
model_name = “deepseek-ai/Janus-Pro-7B”
tokenizer = AutoTokenizer.from_pretrained(model_name)
model = AutoModelForCausalLM.from_pretrained(model_name)
print(“Model downloaded!”)
Hopefully, with the help of this post, you will be able to generate images using DeepSeek.
Read: How to use DeepSeek V3 Coder in Windows 11?
Can I generate images on DeepSeek?
The normal DeepSeek chatbot can’t generate images, however, DeepSeek Janus-Pro lets you generate images via its text-to-image mode. Use prompts like “A sunset over mountains” to create 1024×1024 images. It also combines multimodal understanding (image + text analysis).
Read: How to run DeepSeek locally on Windows 11
How do I create an image using DALL-E?
To create an image using DALL-E, visit labs.openai.com and sign in. Then, enter a detailed text prompt, like “a futuristic cityscape at sunset with flying cars”. Click “Generate” to see up to four variations. Choose your favorite and use “Edit” to refine details or “Variations” for similar designs. Finally, download the image or share it directly.
Also Read: How to use Deepseek in Visual Studio Code.