
Although careful prompt crafting can yield good results, achieving professional-grade visual consistency often requires adapting the underlying model itself. Building on the prompt engineering and character development approach covered in Part 1 of this two-part series, we now push the consistency level for specific characters by fine-tuning an Amazon Nova Canvas foundation model (FM). Through fine-tuning techniques, creators can instruct the model to maintain precise control over character appearances, expressions, and stylistic elements across multiple scenes.
In this post, we take an animated short film, Picchu, produced by FuzzyPixel from Amazon Web Services (AWS), prepare training data by extracting key character frames, and fine-tune a character-consistent model for the main character Mayu and her mother, so we can quickly generate storyboard concepts for new sequels like the following images.
Solution overview
To implement an automated workflow, we propose the following comprehensive solution architecture that uses AWS services for an end-to-end implementation.
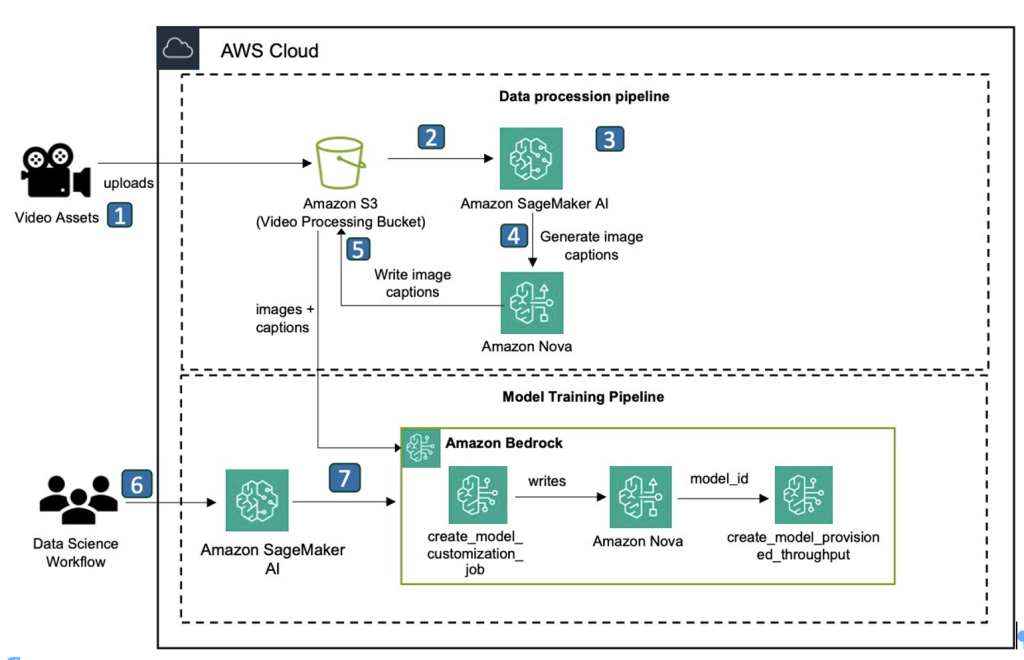
The workflow consists of the following steps:
The user uploads a video asset to an Amazon Simple Storage Service (Amazon S3) bucket.
Amazon Elastic Container Service (Amazon ECS) is triggered to process the video asset.
Amazon ECS downsamples the frames, selects those containing the character, and then center-crops them to produce the final character images.
Amazon ECS invokes an Amazon Nova model (Amazon Nova Pro) from Amazon Bedrock to create captions from the images.
Amazon ECS writes the image captions and metadata to the S3 bucket.
The user uses a notebook environment in Amazon SageMaker AI to invoke the model training job.
The user fine-tunes a custom Amazon Nova Canvas model by invoking Amazon Bedrock create_model_customization_job and create_model_provisioned_throughput API calls to create a custom model available for inference.
This workflow is structured in two distinct phases. The initial phase, in Steps 1–5, focuses on preparing the training data. In this post, we walk through an automated pipeline to extract images from an input video and then generate labeled training data. The second phase, in Steps 6–7, focuses on fine-tuning the Amazon Nova Canvas model and performing test inference using the custom-trained model. For these latter steps, we provide the preprocessed image data and comprehensive example code in the following GitHub repository to guide you through the process.
Prepare the training data
Let’s begin with the first phase of our workflow. In our example, we build an automated video object/character extraction pipeline to extract high-resolution images with accurate caption labels using the following steps.
Creative character extraction
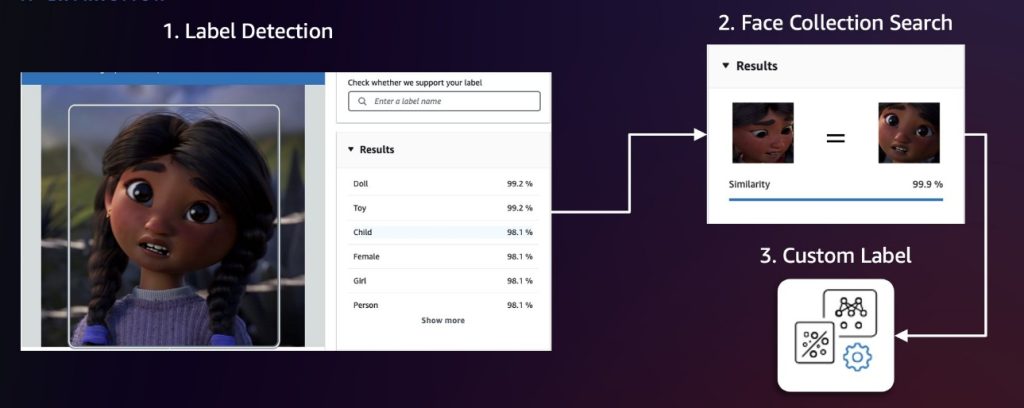
We recommend first sampling video frames at fixed intervals (for example, 1 frame per second). Then, apply Amazon Rekognition label detection and face collection search to identify frames and characters of interest. Label detection can identify over 2,000 unique labels and locate their positions within frames, making it ideal for initial detection of general character categories or non-human characters. To distinguish between different characters, we then use the Amazon Rekognition feature to search faces in a collection. This feature identifies and tracks characters by matching their faces against a pre-populated face collection. If these two approaches aren’t precise enough, we can use Amazon Rekognition Custom Labels to train a custom model for detecting specific characters. The following diagram illustrates this workflow.
After detection, we center-crop each character with appropriate pixel padding and then run a deduplication algorithm using the Amazon Titan Multimodal Embeddings model to remove semantically similar images above a threshold value. Doing so helps us build a diverse dataset because redundant or nearly identical frames could lead to model overfitting (when a model learns the training data too precisely, including its noise and fluctuations, making it perform poorly on new, unseen data). We can calibrate the similarity threshold to fine-tune what we consider to be identical images, so we can better control the balance between dataset diversity and redundancy elimination.
Data labeling
We generate captions for each image using Amazon Nova Pro in Amazon Bedrock and then upload the image and label manifest file to an Amazon S3 location. This process focuses on two critical aspects of prompt engineering: character description to help the FM identify and name the characters based on their unique attributes, and varied description generation that avoids repetitive patterns in the caption (for example, “an animated character”). The following is an example prompt template used during our data labeling process:
The data labeling output is formatted as a JSONL file, where each line pairs an image reference Amazon S3 path with a caption generated by Amazon Nova Pro. This JSONL file is then uploaded to Amazon S3 for training. The following is an example of the file:
Human verification
For enterprise use cases, we recommend incorporating a human-in-the-loop process to verify labeled data before proceeding with model training. This verification can be implemented using Amazon Augmented AI (Amazon A2I), a service that helps annotators verify both image and caption quality. For more details, refer to Get Started with Amazon Augmented AI.
Fine-tune Amazon Nova Canvas
Now that we have the training data, we can fine-tune the Amazon Nova Canvas model in Amazon Bedrock. Amazon Bedrock requires an AWS Identity and Access Management (IAM) service role to access the S3 bucket where you stored your model customization training data. For more details, see Model customization access and security. You can perform the fine-tuning task directly on the Amazon Bedrock console or use the Boto3 API. We explain both approaches in this post, and you can find the end-to-end code sample in picchu-finetuning.ipynb.
Create a fine-tuning job on the Amazon Bedrock console
Let’s start by creating an Amazon Nova Canvas fine-tuning job on the Amazon Bedrock console:
On the Amazon Bedrock console, in the navigation pane, choose Custom models under Foundation models.
Choose Customize model and then Create Fine-tuning job.
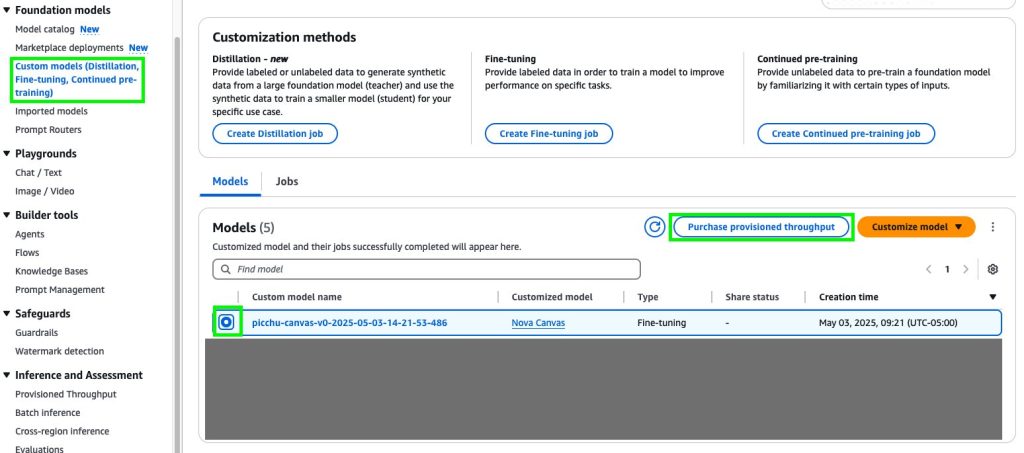
On the Create Fine-tuning job details page, choose the model you want to customize and enter a name for the fine-tuned model.
In the Job configuration section, enter a name for the job and optionally add tags to associate with it.
In the Input data section, enter the Amazon S3 location of the training dataset file.
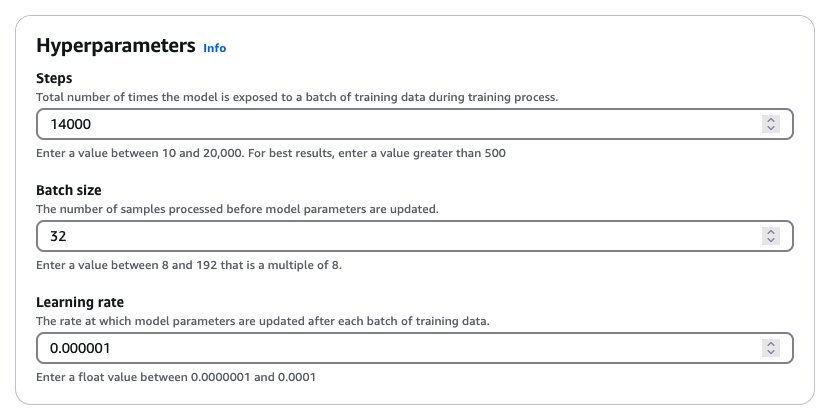
In the Hyperparameters section, enter values for hyperparameters, as shown in the following screenshot.
In the Output data section, enter the Amazon S3 location where Amazon Bedrock should save the output of the job.
Choose Fine-tune model job to begin the fine-tuning process.
This hyperparameter combination yielded good results during our experimentation. In general, increasing the learning rate makes the model train more aggressively, which often presents an interesting trade-off: we might achieve character consistency more quickly, but it might impact overall image quality. We recommend a systematic approach to adjusting hyperparameters. Start with the suggested batch size and learning rate, and try increasing or decreasing the number of training steps first. If the model struggles to learn your dataset even after 20,000 steps (the maximum allowed in Amazon Bedrock), then we suggest either increasing the batch size or adjusting the learning rate upward. These adjustments, through subtle, can make a significant difference in our model’s performance. For more details about the hyperparameters, refer to Hyperparameters for Creative Content Generation models.
Create a fine-tuning job using the Python SDK
The following Python code snippet creates the same fine-tuning job using the create_model_customization_job API:
When the job is complete, you can retrieve the new customModelARN using the following code:
Deploy the fine-tuned model
With the preceding hyperparameter configuration, this fine-tuning job might take up to 12 hours to complete. When it’s complete, you should see a new model in the custom models list. You can then create provisioned throughput to host the model. For more details on provisioned throughput and different commitment plans, see Increase model invocation capacity with Provisioned Throughput in Amazon Bedrock.
Deploy the model on the Amazon Bedrock console
To deploy the model from the Amazon Bedrock console, complete the following steps:
On the Amazon Bedrock console, choose Custom models under Foundation models in the navigation pane.
Select the new custom model and choose Purchase provisioned throughput.
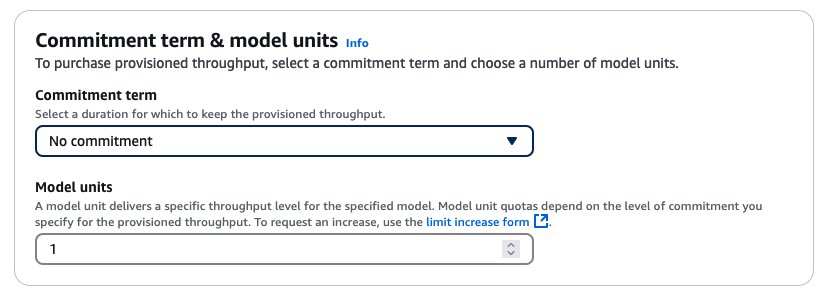
In the Provisioned Throughput details section, enter a name for the provisioned throughput.
Under Select model, choose the custom model you just created.
Then specify the commitment term and model units.
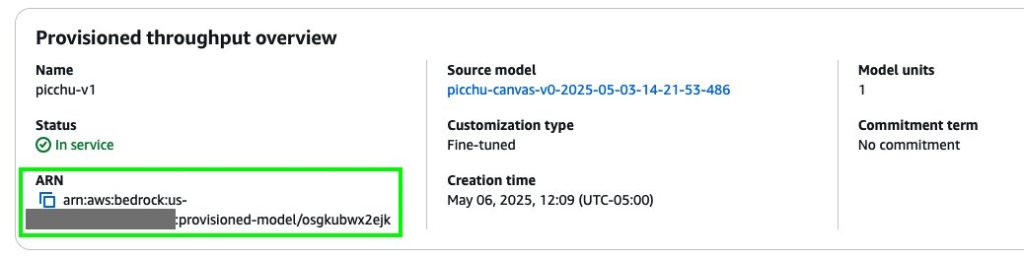
After you purchase provisioned throughput, a new model Amazon Resource Name (ARN) is created. You can invoke this ARN when the provisioned throughput is in service.
Deploy the model using the Python SDK
The following Python code snippet creates provisioned throughput using the create_provisioned_model_throughput API:
Test the fine-tuned model
When the provisioned throughput is live, we can use the following code snippet to test the custom model and experiment with generating some new images for a sequel to Picchu:


Mayu face shows a mix of nervousness and determination. Mommy kneels beside her, gently holder her. A landscape is visible in the background.
A steep cliff face with a long wooden ladder extending downwards. Halfway down the ladder is Mayu with a determined expression on her face. Mayu’s small hands grip the sides of the ladder tightly as she carefully places her feet on each rung. The surrounding environment shows a rugged, mountainous landscape.
Mayu standing proudly at the entrance of a simple school building. Her face beams with a wide smile, expressing pride and accomplishment.
Clean up
To avoid incurring AWS charges after you are done testing, complete the cleanup steps in picchu-finetuning.ipynb and delete the following resources:
Amazon SageMaker Studio domain
Fine-tuned Amazon Nova model and provision throughput endpoint
Conclusion
In this post, we demonstrated how to elevate character and style consistency in storyboarding from Part 1 by fine-tuning Amazon Nova Canvas in Amazon Bedrock. Our comprehensive workflow combines automated video processing, intelligent character extraction using Amazon Rekognition, and precise model customization using Amazon Bedrock to create a solution that maintains visual fidelity and dramatically accelerates the storyboarding process. By fine-tuning the Amazon Nova Canvas model on specific characters and styles, we’ve achieved a level of consistency that surpasses standard prompt engineering, so creative teams can produce high-quality storyboards in hours rather than weeks. Start experimenting with Nova Canvas fine-tuning today, so you can also elevate your storytelling with better character and style consistency.
About the authors
 Dr. Achin Jain is a Senior Applied Scientist at Amazon AGI, where he works on building multi-modal foundation models. He brings over 10+ years of combined industry and academic research experience. He has led the development of several modules for Amazon Nova Canvas and Amazon Titan Image Generator, including supervised fine-tuning (SFT), model customization, instant customization, and guidance with color palette.
 James Wu is a Senior AI/ML Specialist Solution Architect at AWS. helping customers design and build AI/ML solutions. James’s work covers a wide range of ML use cases, with a primary interest in computer vision, deep learning, and scaling ML across the enterprise. Prior to joining AWS, James was an architect, developer, and technology leader for over 10 years, including 6 years in engineering and 4 years in marketing & advertising industries.
 Randy Ridgley is a Principal Solutions Architect focused on real-time analytics and AI. With expertise in designing data lakes and pipelines. Randy helps organizations transform diverse data streams into actionable insights. He specializes in IoT solutions, analytics, and infrastructure-as-code implementations. As an open-source contributor and technical leader, Randy provides deep technical knowledge to deliver scalable data solutions across enterprise environments.